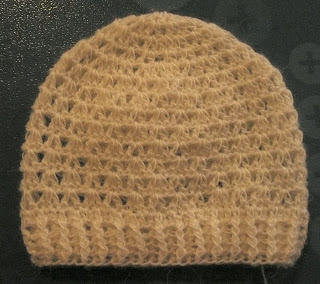
Scroll down for English Version of the pattern.
Este está tejido de arriba hacia abajo, realizando aumentos en las primeras vueltas. Es muy sencillo de hacer y fácil de adaptar tanto en tamaño como en el punto a utilizar. Este es para bebe de 0/3 meses. Utilicé lana bebe muy finita y crochet 2.5 mm.
Se comienza con un aro de 4 cadenetas.
1. Levantar 4 cad, y tejer 1pa en el mismo espacio, 1 cad, *1pa, 1 cad* repetir de *a* diez veces más (completando 12 pa). Cerrar vuelta con pe.
2. Levantar 3 cadenetas y tejer 1 pa en el mismo espacio, tejer 1 pa, 1 cad, 1 pa (pto. V) sobre cada espacio de cadeneta de la vuelta anterior (24 pa) ó 12 "V"). Cerrar vuelta con pe.
3. Levantar 3 cadenetas y tejer 1 pa en el mismo espacio, (1pa, 1 cad y 1 pa = pto V) en el espacio entre pa de la vuelta anterior, 1 pto V, en el espacio de cadeneta de la vuelta anterior. *1 pto V en el sig. espacio de cad, 1 pto V en el espacio entre pa, 1 pto en el sig espacio de cad*, repetir de *a* hasta terminar la vuelta. Cerrar vuelta con pe. (18 pto. V)
4. Levantar 3 cadenetas y tejer 1 pa en el mismo espacio. 1 pto. V sobre cada V de la vuelta anterior (18 pto. V)
5. Repetir la vuelta 3. (28 pto. V)
6. Levantar 3 cad. y tejer 2pa en el mismo espacio, *1 pto V sobre la siguiente V, 3 pa en el espacio de cad. de la siguiente V*. Repetir de *a * hasta terminar la vuelta.
7. Levantar 4 cad. y tejer 1 pa en el mismo espacio, *3 pa en el espacio de cad. de la sig. V, 1 pto V en el espacio de cad. de la sig. V*. Repetir de *a* haste terminar la vuelta.
8.-14. Repetir vueltas 6 y 7.
Pretina:
15. Tejer pb a todo el rededor
16. Levantar 2 cad, tejer mp en los 3 pb sig., saltar 1 pb, *mp en los 3 pb sig., saltar 1 pb*. Repetir de *a* hasta completar la vuelta.
17 - 20. Tejer mp relieve 1/1 (1 mp relieve tomado por delante, 1 mp relieve tomado por detrás) hasta completar la vuelta. Repetir en las siguientes vueltas respetando el orden . Rematar
Para hacer un gorrito más grande bastará con iniciar la vuelta 1 con 14, 16 ó 18 pa. y tejer 1 a 3 vueltas más del punto escogido antes de tejer la "pretina" final
English Version - Another Baby Hat Pattern
This one is crocheted from the top down, making increases in the first 4 rows. It is very easily adapted both in size and in the stitch you may want to use. Used fine baby yarn and a 2.5 mm hook and should fit a 0/3 month old baby
Begin with a 4 chain ring. (close every row with a sl st.)
1. Ch 4, 1dc in same space, ch 1 *dc, ch1* repeat from *to * ten more times, completing 12 dc. Close with sl st.
2. Ch 3, 1 dc in same space, dc, ch1, dc (V st), in every ch 1 space on the previous row. (24 dc or 12 V st)
3. Ch 3, dc in same space, V st between dc of the previous row, V st over next V st, *V st over next Vst, V st between dc, V st over next V st.* repeat from * to * to complete row. (18 V st)
4. Ch 3, dc in same sp., V st over every V st on the previous row. (18 V st)
5. Repeat as row 3. (28 V st)
6. Ch 3, 2 dc in same space, *V st over V st from previous row, 3 dc over next V st.* repeat from * to * to complete row.
7. Ch 4, dc in same space, *3 dc over next Vst, V st over next V st*, repeat from * to * to complete row.
8. to 14. Repeat rows 6 and 7
Ribbing:
15. sc all around
16. Ch 2, hdc in next 3 sc, *sk 1 st, hdc in next 3 sc *, repeat from *to*
17. to 20. Ch 2, 1 front post half double crochet (fphdc) , 1 back post half double crochet (bphdc ) to end of row.
To make a bigger size hat simply begin row 1 with 14, 16 or 18 dc stitches and add 1 to 4 additional rows before final "ribbing"


